Home About Me Polish Wishlist Contact
Showing posts with label Black. Show all posts

Monday, 8 July 2013

Nails Inc Leather & Skulls in Noho

I'm a huge fan of textured nail polishes, so when Nails Inc released their line of leather polishes a few months back I just knew I had to purchase them straight away. I didn't actually get round to giving them a go until May for my sixth form leavers ball but it was well worth the wait!
Bling It On: Leather & Skulls in Noho. RRP £19


I used the black leather polish - Noho - as an accent nail with one of the silver skulls that are included in the set. The application process in terms of the skulls may seem a hassle but it's surprisingly easy once you get going, it wasn't anywhere near as bad as I thought it would be - so that was a pleasant surprise!

Nails Inc Noho with silver skull as an accent and
OPI Liquid Sand in Solitaire for the other fingers

There are instructions on the back of the box but I will briefly explain the whole process. Firstly, you need to apply two coats of the polish and ensure it is fully dry. Note that you shouldn't use a top coat with these because it will ruin the effect! Take the small bottle of glue that is included and apply a small drop to your nail and to the back of the skull. Use tweezers to place the skull in the centre of the nail and hold it down for at least 60 seconds to allow enough time for the glue to set. You will be able to feel whether or not it has stuck properly. Finish off by using the wooden stick to apply glue to the edges of the skull to add extra strength

I think the skulls look amazing but I don't think they are the most practical things ever. They can catch on things quite easily. For example, washing your hair is a big no no because they just get stuck in it :( I removed the skulls after 2 days because of this and I knew they were likely to snag on clothes whilst I was at work, which wouldn't have been great. They are really great for a special occasion or if you're going out for the night though because they look absolutely fab - soooo sparkly.

However, the great thing about the skulls is that they can be reused! How amazing is that?! Just dip your finger in  nail polish remover until the glue has softened and the skull can then be removed, cleaned up (if required) and saved for later. You can do this by using tweezers.

This is me before leavers ball with my nails :)
As you can see I was very colour coordinated/monochrome haha
Overall, I'd definitely recommend these leather polishes, so well done Nails Inc! You can buy the polishes by themselves in a range of colours for £12 or in a set with the skulls for a slightly higher price of £19. They are available direct from nailsinc.com, asos.com or selected Boots just to name a few.

Until next time! xoxo


Thursday, 21 February 2013

Mariah Carey OPI Liquid Sand Polishes - The Impossible & Stay The Night

Hi everyone!

I have been meaning to do a post on OPI's first liquid sand polishes since they came out over a month ago now, but I've only just recently had the time to test them out! I love how OPI are always one of the first brands out there to invent new types of polish like these. These are part of the Mariah Carey collection and there are 4 liquid sand polishes and 4 regular polishes.

The colours in the collection are:
The Impossible - a bright red with star shaped confetti
Stay The Night - a black/pink mix
Can't Let Go - purple
Get Your Number - blue

I absolutely love these polishes. They give off such a unique effect. The texture is amazing, it's like gritty but not so gritty that it's sharp, horrible to touch or would easily snag on clothing or anything. I've had this polish on a week now and it's starting to become a bit more 'flat', shiny and less textured if that makes sense, but it still looks and feels fine. The polishes also seem to last really well on your nails, I only have very minimal tip wear - no chipping yet whatsoever. I've received so many compliments and people asking to touch my nails whilst wearing this! I can't yet comment on removal because I haven't taken it off yet but I'm hoping it isn't as bad as normal glitter...

The Impossible with Stay The Night as an accent nail
It's important to note that these polishes only give off the "sand" effect when used without a top coat. By all means if you want to achieve a slightly different look, then go ahead and apply one. It just means the texture won't be present and the polish will appear to be slightly more  'jelly' looking. I've heard that these polishes can eat insane amounts of top coat too, so if you do want to give this a go then I'm guessing you're gonna have to layer quite a few coats! It's really cool for an alternative though because it's almost like getting two polishes in one. :)

I can't wait to see what other liquid sand polishes OPI release this year! What do you think?


Saturday, 8 December 2012

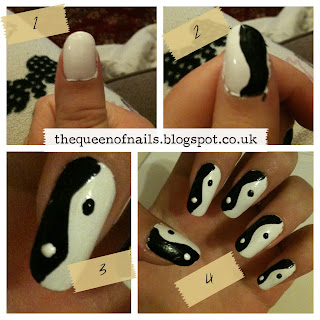
Yin Yang Nail Art with Step-by-Step Tutorial!

Hello everyone,

Today I have tutorial for you. I'm going to show you some really simple "Yin-Yang" nails. These were inspired by the nails that Katy Perry had done for the September 2012 issue of US Elle magazine.
This was the image used on the cover - you can just about see the design on her nails!


Here are my own nails finished
Okay so onto the tutorial:


You will need:
- (Optional) base coat
- White nail polish (I used OPI Alpine Snow)
- Black nail polish (I used Jack Wills Black)
- Black and white nail art pens or some sort of dotting tool
- (Optional) top coat

STEP 1) Paint your base coat and ensure it's fully dry. Then you need to do 2-3 coats of your white nail polish. The reason I say do the white first is because it's much easier to do black on the white rather than trying to cover up black with white on top (if you get what I mean!).

STEP 2) This bit is quite fiddly, but just take your time and you should be fine. Make the line for the black half of the nail by doing a free-hand "wave". I used a striper brush to do this but if you're feeling brave you could just use the regular brush in your polish. Fill in from the line right to the edge of your nail so that one half of your nail is covered in black. Do as many coats as you need to for the white polish to become invisible underneath.

STEP 3) Use whatever you're using as your dotting tool to place a small white dot on the black side of your nail and a small black dot on the white side. Obviously make sure they're at opposite ends of the nail like my photo shows or it wouldn't be the correct pattern for yin yang!!

STEP 4) All done! If you are choosing to use a top coat on your nails, then do this now. Just make sure your nails are absolutely dry and "hover" the brush over the nail rather than dragging it to ensure your don't smudge your design.

Hope this helped some of you :)

Thursday, 6 December 2012

WAH x Models Own Nail Art Pens

Hi everyone!

Today I just wanted to do a quick post on the WAH Nails and Models Own collaboration nail art pens. These aren't new on the scene, but I'm going to do a post on them anyway because they are some of my favourite tools to use when doing my nails. The colours they are currently available in as follows: Black, White, Blue, Pink, Yellow, with recent additions of Silver & Gold (festive season, yay!).


I absolutely love these pens! I have them in all the colours. They're great because the have one end that acts as a dotter for precise detail and then the other end is a striper brush to create smooth, straight lines. They are really easy to use, even if you don't have the steadiest of hands. I was really surprised even when I did my other hand, yes the result is never quite as perfect as my left hand, due to me being right-handed, but it still looked great - much better than trying to do free-hand patterns.

If you haven't got any already, they retail at £6 each and can be bought at Boots (in stores nationwide and online), the Models Own website and the Models Own Bottleshop located in Westfield at White City, London. Boots quite often run promotions such as 3 for 2 or a free nail art pen when you buy two other MO products so it's definitely worth keeping an eye out for any special offers.

Here is some striped nail art I created with the help of my all time favourite WAH x Models Own Nail Art Pen in White.

OPI Planks a Lot is the purple base colour.

In terms of the colours themselves, the shades are actually really lovely. The pink, blue and yellow are all very bright but I didn't have a problem with that because I like my statement nails, haha. The gold pen that I bought most recently appeared to be not as gold toned as I would have liked, more of a bronze to me, especially when applied on the nail (see previous post on Rita Ora Nails). However, I don't know if I just got a bit of an "off" bottle, so they might not necessarily be all like this. All in all, I would definitely recommend this product to anyone, regardless of your skill with nails.

Which colour is your personal favourite? I don't think I can call it!

Friday, 2 November 2012

Mini Bow Nail Art with Tutorial

Hi guys! I can't believe it's friday already - school half-term holiday has gone so incredibly fast, but it's really cool that the next time we break up, it will be for christmas! I'm so excited for it already haha. Anyway, time to get onto the post.

Today I'm going to give you a tutorial on how to do a cute little bow manicure yourself.
Please bear with me as this is my first attempt at doing a tutorial!

Here you can see the finished product:


Now onto the tutorial! I hope it all makes sense - like I say, bear with me. It's actually a really simple look to achieve.

See steps below that refer to each picture! Enlarge this if you need to.


You will need:
- 2 different coloured nail polishes (here I've used OPI's 'If You Moust You Moust' and Nicole By OPI's 'My Lifesaver'). You could do this with just the one colour but I personally think it looks prettier with two.
- Striper brush with black and white nail polishes / or white and black nail art pens.
- Dotting tool or a toothpick, hair grip etc
(- Base and top coats)

STEP 1) If you're using a base coat, apply it and make sure it's dry. Then move on to paint each nail with 2-3 coats of your chosen polish (obviously this depends on how sheer your polish is).

STEP 2) Once you've made sure the colour is dry, you're ready to start the first step of creating the bow. You need to use your striper brush with white nail polish to make two diagonal lines that cross over each other in the middle. It doesn't matter too much if the lengths are slightly different because this gets tidied up in the next step.

STEP 3) Join up the ends of each line using the striper brush again so you end up with the basic structure of the bow itself.

STEP 4) Fill in the two empty sections using white nail polish. Top tip!: if you find your nail polish brush is a bit too big to do this neatly/without going over the lines, use a dotting tool or something like a toothpick to do it instead :)

STEP 5) Now you need to place a white dot in the middle of the bow using whatever you are using as your dotting tool.

STEP 6) Finally, we're going to outline the bow. For this you can either use the striper brush (if you're feeling brave haha - it can be quite fiddly!), your dotting tool or nail art pen. I used my WAH x Models Own nail art pen in black. Firstly, outline the middle dot/circle. Then do the very edges of the bow. Lastly, make two very small lines coming out of the middle part of the bow to give it depth. Be careful not to make them too long or they won't look as realistic! Make sure everything's dry and then add a top coat if you desire. (Be careful if you've used a nail art pen - I often find they smudge if you don't leave enough drying time or have too much top coat on your brush!)

And that's it! Hope this proved useful to some of you. Don't hesitate to leave me a comment if you have any additional questions or need some tips. I'd also love to see pictures if any of you do try to create this look yourselves :)

Wednesday, 31 October 2012

Happy Halloween!: Nail Art

Happy Halloween everyone! Hope you've all had a good day.Did anyone do anything nice to celebrate? It wasn't really for halloween, but I went to see Skyfall at the cinema earlier - it was fantastic! I'd definitely recommend a trip to see it if you haven't already.

Just a quick post today, I wanted to show you guys some Halloween nail art I did this morning. I absolutely love doing themed nails.


The orange I used is OPI In My Back Pocket and the black is Barry M Black. On my pinkie I also used OPI Metallic 4 Life for the glitter on the spider's web. My favourite nail art pens by WAH / Models Own were used in black and white and the orange nail art pen was just from a set I bought in Topshop (link here if anyone is interested).

Now onto my thumb, I'm really excited about this one! This is In My Back Pocket with OPI BLACK SPOTTED over the top. This was a French Sephora exclusive that launched with the spiderman collection over the summer. I won't got into too much detail about it because I'm planning on doing another post on it in the near future. But doesn't it look fabulous? I LOVE IT!!

That's all for now, thanks for reading :)