Home About Me Polish Wishlist Contact
Showing posts with label Nail Art. Show all posts

Friday, 5 July 2013

USA Flag July 4th Nail Art

Hello everyone! Wow, it's been a while.. I've just had so much going on the past few months so I haven't had any spare time at all to blog but I'm now going to make a real effort to find the time to post as regularly as possible.

Ok so I know I'm a day late with these nails, but never mind! Thought I'd post them anyway since they're fun. It was Independence Day yesterday in the states, as you'll all probably know. Whilst I'm not from the USA, I've always had a huge interest in America. It's one of my favourite places despite the fact I've never been, I definitely want to take a trip over there one day. I love an excuse to do themed nail art so this was my latest design.

Stars and stripes!

The nails above were inspired by the USA flag/July 4th. The colours I used are as follows:

RED: OPI Cherry Much In Love
WHITE: OPI Alpine Snow
BLUE: OPI Ogre The Top Blue

It's really simple to get the look - create the red and white stripes first, then add the blue to each tip. To finish off the design, use a small nail art brush or pen with the white nail polish to draw three small stars on each nail and you're done! Make sure to leave lots of drying time before you put on a top coat!

Did anyone else do an American nail art design yesterday?


Monday, 28 January 2013

18th Birthday Weekend & Nail Art!

Hey everyone!

It was my 18th birthday on Friday (25th). I did mean to do this post then but I was just so busy and didn't have time over the weekend either as I took a trip to London. For my birthday I got money, nail polishes (duh!), jewellery, a new pink OnePiece, Juicy Couture Perfume and some other bits and pieces. I also got a really cute box full of little surprises from one of my friends at school with some makeup and nail polish in, it's so nice! The trip to London was also part of my present from my mum and I went to see 'Stomp' on Friday night. It was amazing - so much better than I expected! I would recommend seeing it if you haven't already. It's choreographed really cleverly and has lots of humour throughout, considering the actors don't talk at all. I also went to see Pitch Perfect on Sunday morning. I had wanted to see it since it came out back in December but I was so busy with revising for my English exam that I just didn't have the time. Glad I got to finally see it before it leaves cinemas. It was really good! It made me want to live in America and be in an acapella group like that haha. Some parts were absolutely hilarious, Rebel Wilson gives an amazing performance as 'Fat Amy' throughout. I can't wait until it's out on DVD so I can watch it again! But anyway, enough about my life and onto the nails!

Birthday cupcakes with a number 18 accent nail
I absolutely love doing my nails for special occasions like this. I received many compliments on these across the weekend. In particular, when I visited the Models Own Bottleshop at Westfield Shopping Centre (White City/Shepard's Bush) one of the sales assistants couldn't believe that I'd done them myself and they were my own nails! She even ended up getting all of her colleagues over for them to have a look at my nails too. We then went on to have a conversation about our favourite shades from the brand. It's so nice when you speak to fellow polishaholics!

The polishes I used were as follows:
- OPI Play The Peonies as a base underneath the cakes
- OPI Kiss Me On MY Tulips for the cupcake cases and the accent nail
- OPI PEdal Faster Suzi! for the icing
- OPI Rainbow Connection for the sprinkles
- Nicole By OPI Step to the Beat of My Heart for the cherries on top
- My trusty WAH Nails x Models Own Nail Art Pen in white for the stripes on the cupcake cases and the '18'

I did originally intend to do a tutorial for these nails but I forgot to take pictures step-by-step :( sorry about that!

Hope you all had a lovely weekend, until the next time :)

Saturday, 8 December 2012

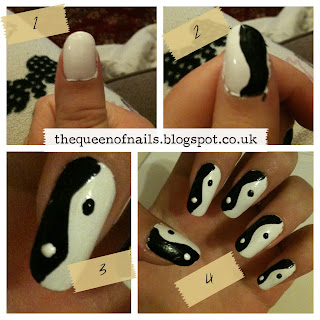
Yin Yang Nail Art with Step-by-Step Tutorial!

Hello everyone,

Today I have tutorial for you. I'm going to show you some really simple "Yin-Yang" nails. These were inspired by the nails that Katy Perry had done for the September 2012 issue of US Elle magazine.
This was the image used on the cover - you can just about see the design on her nails!


Here are my own nails finished
Okay so onto the tutorial:


You will need:
- (Optional) base coat
- White nail polish (I used OPI Alpine Snow)
- Black nail polish (I used Jack Wills Black)
- Black and white nail art pens or some sort of dotting tool
- (Optional) top coat

STEP 1) Paint your base coat and ensure it's fully dry. Then you need to do 2-3 coats of your white nail polish. The reason I say do the white first is because it's much easier to do black on the white rather than trying to cover up black with white on top (if you get what I mean!).

STEP 2) This bit is quite fiddly, but just take your time and you should be fine. Make the line for the black half of the nail by doing a free-hand "wave". I used a striper brush to do this but if you're feeling brave you could just use the regular brush in your polish. Fill in from the line right to the edge of your nail so that one half of your nail is covered in black. Do as many coats as you need to for the white polish to become invisible underneath.

STEP 3) Use whatever you're using as your dotting tool to place a small white dot on the black side of your nail and a small black dot on the white side. Obviously make sure they're at opposite ends of the nail like my photo shows or it wouldn't be the correct pattern for yin yang!!

STEP 4) All done! If you are choosing to use a top coat on your nails, then do this now. Just make sure your nails are absolutely dry and "hover" the brush over the nail rather than dragging it to ensure your don't smudge your design.

Hope this helped some of you :)

Thursday, 6 December 2012

WAH x Models Own Nail Art Pens

Hi everyone!

Today I just wanted to do a quick post on the WAH Nails and Models Own collaboration nail art pens. These aren't new on the scene, but I'm going to do a post on them anyway because they are some of my favourite tools to use when doing my nails. The colours they are currently available in as follows: Black, White, Blue, Pink, Yellow, with recent additions of Silver & Gold (festive season, yay!).


I absolutely love these pens! I have them in all the colours. They're great because the have one end that acts as a dotter for precise detail and then the other end is a striper brush to create smooth, straight lines. They are really easy to use, even if you don't have the steadiest of hands. I was really surprised even when I did my other hand, yes the result is never quite as perfect as my left hand, due to me being right-handed, but it still looked great - much better than trying to do free-hand patterns.

If you haven't got any already, they retail at £6 each and can be bought at Boots (in stores nationwide and online), the Models Own website and the Models Own Bottleshop located in Westfield at White City, London. Boots quite often run promotions such as 3 for 2 or a free nail art pen when you buy two other MO products so it's definitely worth keeping an eye out for any special offers.

Here is some striped nail art I created with the help of my all time favourite WAH x Models Own Nail Art Pen in White.

OPI Planks a Lot is the purple base colour.

In terms of the colours themselves, the shades are actually really lovely. The pink, blue and yellow are all very bright but I didn't have a problem with that because I like my statement nails, haha. The gold pen that I bought most recently appeared to be not as gold toned as I would have liked, more of a bronze to me, especially when applied on the nail (see previous post on Rita Ora Nails). However, I don't know if I just got a bit of an "off" bottle, so they might not necessarily be all like this. All in all, I would definitely recommend this product to anyone, regardless of your skill with nails.

Which colour is your personal favourite? I don't think I can call it!

Sunday, 25 November 2012

Nails Art Inspired by Rita Ora's 'R.I.P' Video

Hi guys!

How's your week been? It's exactly one month until christmas today and I'm so excited! I managed to do lots of christmas shopping this week due to all the black friday deals. Did anyone pick up anything nice? I don't know about you but I feel so much better about spending when things are on sale, haha.

Just a quick post today - I'm going to show you my most recent nails. Rita Ora is one of my favourite artists right now so I decided to do a set of nails similar to her's in her video for R.I.P.


To do this, I used Nails Inc St. James and then WAH x Models Own Nail Art Pen in Gold. It was really easy to achieve this look, but I did my dots a bit smaller than Rita's, hence my having 5 on each nail rather than 4. The dots also aren't as close together as Rita's but I still like the way they turned out. I think these nails are quite festive too, due to the red and gold. Many people said they looked christmassy and didn't actually realise they were inspired by the video until I said so. :( I guess you wouldn't know though unless you're a big fan of Rita, like myself!

What do you think?

Friday, 2 November 2012

Mini Bow Nail Art with Tutorial

Hi guys! I can't believe it's friday already - school half-term holiday has gone so incredibly fast, but it's really cool that the next time we break up, it will be for christmas! I'm so excited for it already haha. Anyway, time to get onto the post.

Today I'm going to give you a tutorial on how to do a cute little bow manicure yourself.
Please bear with me as this is my first attempt at doing a tutorial!

Here you can see the finished product:


Now onto the tutorial! I hope it all makes sense - like I say, bear with me. It's actually a really simple look to achieve.

See steps below that refer to each picture! Enlarge this if you need to.


You will need:
- 2 different coloured nail polishes (here I've used OPI's 'If You Moust You Moust' and Nicole By OPI's 'My Lifesaver'). You could do this with just the one colour but I personally think it looks prettier with two.
- Striper brush with black and white nail polishes / or white and black nail art pens.
- Dotting tool or a toothpick, hair grip etc
(- Base and top coats)

STEP 1) If you're using a base coat, apply it and make sure it's dry. Then move on to paint each nail with 2-3 coats of your chosen polish (obviously this depends on how sheer your polish is).

STEP 2) Once you've made sure the colour is dry, you're ready to start the first step of creating the bow. You need to use your striper brush with white nail polish to make two diagonal lines that cross over each other in the middle. It doesn't matter too much if the lengths are slightly different because this gets tidied up in the next step.

STEP 3) Join up the ends of each line using the striper brush again so you end up with the basic structure of the bow itself.

STEP 4) Fill in the two empty sections using white nail polish. Top tip!: if you find your nail polish brush is a bit too big to do this neatly/without going over the lines, use a dotting tool or something like a toothpick to do it instead :)

STEP 5) Now you need to place a white dot in the middle of the bow using whatever you are using as your dotting tool.

STEP 6) Finally, we're going to outline the bow. For this you can either use the striper brush (if you're feeling brave haha - it can be quite fiddly!), your dotting tool or nail art pen. I used my WAH x Models Own nail art pen in black. Firstly, outline the middle dot/circle. Then do the very edges of the bow. Lastly, make two very small lines coming out of the middle part of the bow to give it depth. Be careful not to make them too long or they won't look as realistic! Make sure everything's dry and then add a top coat if you desire. (Be careful if you've used a nail art pen - I often find they smudge if you don't leave enough drying time or have too much top coat on your brush!)

And that's it! Hope this proved useful to some of you. Don't hesitate to leave me a comment if you have any additional questions or need some tips. I'd also love to see pictures if any of you do try to create this look yourselves :)

Tuesday, 31 July 2012

OPI Who The Shrek Are You Swatch / Daisy Nail Art

Hello guys! Wow, sorry I haven't posted for so long.. I've just been super busy in real life. I promise to make a bigger effort to keep this up to date, especially now it's the school holidays - it's good procrastination from homework. :P
Anyway, on with the post! Today I have for you some pictures of 'Who The Shrek Are You' from OPI's Shrek Forever After Collection. This was released in 2010 so it's 2 years old now but the polishes aren't that hard to find if you search on eBay. :) Personally, I think this is the nicest colour from the collection because... well just because it's so SHREK! haha

Onto the pictures (sorry, they're a bit rubbish still but I'm trying to get better! ha):


Under Direct Light


Natural Lighting
And finally some nail art. I used WAH x Models Own Nail Art Pens (my saviours!) in White and Yellow to do the daisies. It's simple and easy to do but very effective at the same time. Also makes you feel very summery, appropriate for the time of year.
Daisy Nail Art
The formula on this was average, but be warned - it's sheer! The photos above were all 3 coats but as you can see there's still some VNL so it would need a good strong base colour underneath or 4 coats in my opinion, which is a shame. :( The actual colour of this is hard to describe, but just think of shrek and you're there haha. I think this also might be very similar to 'Did It On 'Em' from Nicki Minaj's OPI line that was release at the start of this year. I might be wrong as I don't have it to do comparisons unfortunately, I didn't buy it due to thinking it was too close to this colour which I already owned.

What do you all think? Let me know in the comments! :)